In the ever-evolving landscape of software development, version control stands as an indispensable pillar. It is the unsung hero behind the scenes, diligently keeping track of every change in your codebase, facilitating collaboration, and providing a safety net when things go awry.
When it comes to full-stack projects, where multiple technologies and contributors are involved, the need for robust version control becomes even more pronounced. Enter Git and GitHub, the dynamic duo that reigns supreme in the world of version control for developers.
In this blog, we will go through the intricacies of Git and GitHub, uncovering their inner workings, exploring practical use cases, and gaining a deeper understanding of how they empower full-stack development. So let us get started.
What is Version Control?

At its core, version control is a system that manages changes to a set of files over time. It allows you to track the history of alterations, revert to previous states, and work collaboratively without stepping on each other’s toes. Think of it as a meticulous librarian who keeps a record of every book ever written, complete with annotations on who made what changes and when.
Why Version Control Matters
Now, you might be wondering, “Why bother with version control? We can just save multiple copies of the project with different names. While that approach might work for a small school project, it is a recipe for disaster when it comes to real-world software development.
Here are some compelling reasons why version control matters
- Makes Collaboration Easy
- Code History & Accountability
- Error Recovery
- Experimentation
Understanding Git
![]()
Git can be defined as the underlying version control system that powers a significant portion of the software development world. Git is known for its speed, flexibility, and distributed nature, making it an ideal choice for projects of all sizes.
Getting Started with Git
To get started you will first need to install Git on your system. Head over to the official Git website to download and install the appropriate version for your platform.
Once installed, open your terminal (or Git Bash on Windows) and let us configure Git with your details:
bash
# Configure your username
git config –global user.name “Your Name”
# Configure your email address
git config –global user.email “your.email@example.com“
These configurations are essential as they associate your name and email with the commits you make, allowing others to know who made each change in the project’s history.
Key Git Commands
Now that you have Git up and running, let us get acquainted with some of the fundamental Git commands
git init: Initializes a new Git repository in your project folder.
git add <file>: Stages changes, ready for committing.
git commit -m “Your commit message”: Commits the staged changes along with a descriptive message.
git status: Shows the current status of your repository, including changes yet to be committed.
git log: Displays a chronological history of commits in the repository.
These commands form the building blocks of your version control workflow.
Creating a Git Repository

Now that we are equipped with the basics of Git, it’s time to start the version control by creating a Git repository for your full-stack project.
Initializing a Git Repository
To initiate a Git repository for your project, navigate to your project’s root directory in the terminal and run the following command:
bash
git init
This command initializes a new Git repository in your project folder, and Git will begin tracking changes to all files within that directory.
You will see an acknowledgment message indicating that the repository has been initialized.
As you start tracking files with Git, not everything in your project should be version-controlled. Build artifacts, temporary files, and sensitive data often fall into this category. To keep your repository clean and avoid tracking unnecessary files, it is essential to create a .gitignore file in your project’s root directory.
For example, a typical .gitignore file for a Node.js project might look like this:
plaintext
# Ignore node_modules directory
node_modules/
# Ignore logs and temporary files
*.log
*.tmp
# Ignore environment-specific configuration files
.env
The .gitignore file tells Git which files and directories to exclude from version control.
With your Git repository set up and your .gitignore configured, you’re now ready to start tracking changes to your project.
Branching and Merging
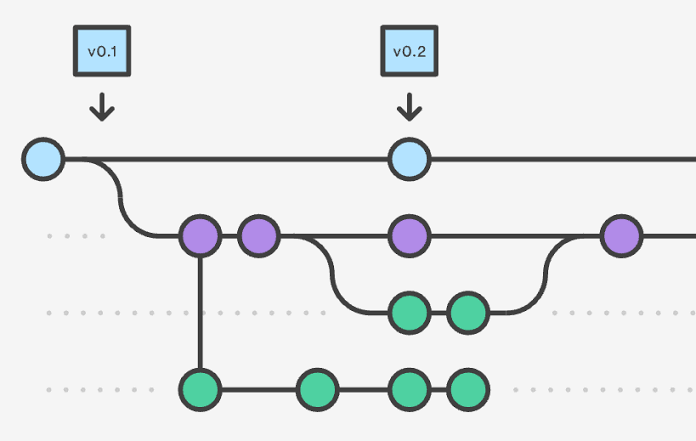
Git’s ability to handle branching and merging is a game-changer in collaborative development. Branches allow you to work on isolated features or bug fixes without affecting the main codebase. Later, you can merge your changes back into the primary branch.
Creating a New Branch
To create a new branch, you can use the following command:
bash
git branch <branch-name>
For example, to create a new branch for a feature called “user-authentication,” you can run:
bash
git branch user-authentication
This command creates a new branch but does not switch to it yet.
Switching Between Branches
To switch to a different branch, you can use the git checkout command
bash
git checkout <branch-name>
For example, to switch to the “user-authentication” branch:
bash
git checkout user-authentication
Now, any changes you make will be within the “user-authentication” branch.
Merging Branches
Once you have completed work on a branch, it’s time to merge your changes back into the main branch (usually “master” or “main”). The process of combining changes from one branch into another is known as merging.
To merge a branch into another branch, you can use the git merge command
bash
# Make sure you’re on the target branch first
git checkout <target-branch>
# Merge the source branch into the target branch
git merge <source-branch>
For instance, to merge changes from “user-authentication” into the “main” branch:
bash
git checkout main
git merge user-authentication
This action brings the changes from “user-authentication” into the “main” branch, and your project now includes the new feature.
Collaboration with GitHub

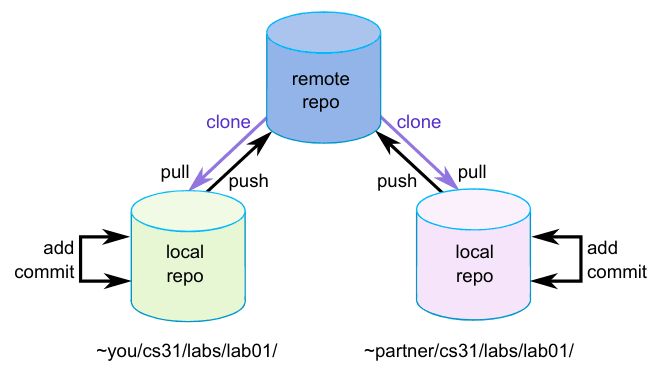
While Git is powerful for local version control, it’s GitHub that takes your collaborative full-stack project to the next level. GitHub is a web-based platform that hosts Git repositories, making it easy for multiple developers to work together seamlessly.
Creating a GitHub Repository
To host your Git repository on GitHub, follow these steps:
- Sign in to your GitHub account (or create one if you don’t have an account).
- Click the “+” icon in the upper right corner and select “New repository.”
- Fill in the repository name, description, and other details.
- Choose the visibility of your repository (public or private).
- Optionally, initialize your repository with a README file, which can serve as project documentation.
- Click the “Create repository” button.
Once the remote repository is created, we have to connect it with the Git repository.
Linking Local Git Repository to GitHub

To link your local repository to the GitHub remote, follow these steps:
- On the GitHub repository page, click the “Code” button. You’ll see options for HTTPS, SSH, or GitHub CLI URLs.
- Choose your preferred method for cloning the repository. HTTPS is the most common option for beginners.
- Copy the URL provided.
In your local Git repository, run the following command, replacing <repository-url> with the URL you copied:
bash
git remote add origin <repository-url>
This command establishes a connection between your local repository and the GitHub repository.
To verify the remote connection, run:
bash
git remote -v
You should see “origin” listed with the URL you provided.
With your local and remote repositories linked, you can now push your local changes to GitHub, enabling seamless collaboration with others.
Pushing Changes to GitHub
To push your local Git repository’s commits to GitHub, use the git push command:
bash
git push origin <branch-name>
For example, to push changes from the “main” branch:
bash
git push origin main
This action uploads your changes to the GitHub repository, allowing others to see your work and collaborate effectively.
Pull Requests and Code Reviews
GitHub’s pull request (PR) feature is a powerful tool for collaboration. When you want to introduce changes from one branch to another, you can create a pull request.
This PR serves as a discussion thread where team members can review your code, provide feedback, and suggest improvements.
To create a pull request
- On your GitHub repository’s main page, click the “Pull requests” tab.
- Click the green “New pull request” button.
- Select the base branch (the branch you want to merge into) and the compare branch (the branch with your changes).
- Add a descriptive title and comment summarizing your changes.
- Click the “Create pull request” button.
Now, your team members can review your code, add comments, and discuss the proposed changes directly on GitHub. Once everyone is satisfied, the changes can be merged into the target branch.
Handling Merge Conflicts
These conflicts arise when Git can’t automatically merge changes from one branch into another due to conflicting changes in the same part of a file.
Handling merge conflicts is a common task in full-stack development. Fortunately, Git provides tools to resolve conflicts gracefully.
Identifying Merge Conflicts
When a merge conflict occurs, Git will notify you and see messages like this:
plaintext
Auto-merging file.txt
CONFLICT (content): Merge conflict in file.txt
These messages indicate that Git couldn’t automatically merge changes in “file.txt” and that manual intervention is required.
Resolving Merge Conflicts
To resolve a merge conflict, follow these steps:
Open the conflicted file(s) in your code editor. You’ll see conflict markers like this:
plaintext
<<<<<<< HEAD
This is the current change.
=======
This is the incoming change.
>>>>>>> incoming-branch
The section between <<<<<<< HEAD and ======= represents the changes in your current branch, while the section between ======= and >>>>>>> incoming-branch represents the changes from the incoming branch.
Edit the file to resolve the conflict. You can choose to keep one set of changes, combine them, or make entirely new changes.
After resolving the conflict, remove the conflict markers (<<<<<<<, =======, >>>>>>>) and save the file.
Stage the resolved file:
bash
git add file.txt
Commit the resolved changes:
bash
git commit -m “Resolved merge conflict in file.txt”
Now, you have successfully resolved the merge conflict, and Git will recognize the file as resolved.
Pushing the Resolved Conflict
Once you have resolved the conflict and committed your changes, you can push them to GitHub as usual:
bash
git push origin <branch-name>
Now, your branch on GitHub will reflect the resolved state, and you can proceed with the pull request or further collaboration.
Conclusion
Version control with Git and collaboration on GitHub are essential skills for full-stack developers. They provide a structured and efficient way to manage code, collaborate with team members, and maintain a robust project history.
As you continue your full-stack development journey, you need to understand that version control is not just a tool; it’s a methodology that enhances your ability to work effectively with others, maintain code quality, and navigate the complexities of modern software development.
By mastering Git and GitHub and adopting best practices, you are well on your way to becoming a proficient and productive full-stack developer. So, go forth, create amazing projects, and let version control be your trusted companion on this exciting coding adventure.


Add comment