Do you know about Product Flavors in Android? Why do we need Product Flavors?
I’ll give you an example of why we may need Android flavors. Suppose you want to publish your app in two sections. The first one is “free” and the second one is “paid”.
The free app will contain only 3 features out of 6, and the paid app will contain all the features available for users. Aside from this, all other functionalities are the same for the two apps.
What should we do to achieve this?
Your initial thought would be to maintain two different codebases or projects for each app. But… but… will this be fine to maintain two different heavy-sized projects? Of course not!
Doing changes in both projects manually and repeatedly will be error-prone. This will be a tedious task to do as there are chances of misconfiguration.
So here, Product Flavors come into the picture. Using flavors, you can build multiple apps by just maintaining a single codebase. 😉

Different Flavors
What are Product Flavors?
Product flavor is a very powerful feature available in the Android Gradle Plugin that allows us to manage different variants of an application.
Product flavors are useful when you want to create different versions of your app while using a single codebase.
Now, I will give an explanation of some keywords for better clarity.
Build Variants
Build variants are the result of Gradle using a specific set of rules to combine settings, code, and resources configured in your build types and product flavors.
Build variants are formed using build types and product flavors.
Build Types
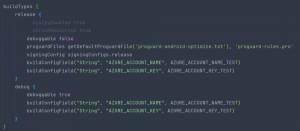
A build type determines how an app is packaged. It refers to build and packaging settings like signing configuration for a project.
By default, the Android plug-in for Gradle supports two different types of builds: “debug” and “release”.
buildTypes {
release {
debuggable false
minifyEnabled false
proguardFiles getDefaultProguardFile(‘proguard-android-optimize.txt’), ‘proguard-rules.pro’
} debug {
debuggable true
}
}

Creating Product Flavors
To create product flavors, go to build.gradle file and create your flavors inside android block like this –
flavorDimensions += “version”
productFlavors {
create(“free”) {
dimension = “version”
applicationIdSuffix = “.free”
versionNameSuffix = “-free”
}
create(“paid”) {
dimension = “version”
applicationIdSuffix = “.paid”
versionNameSuffix = “-paid”
}
}
All flavors must belong to a named flavor dimension, which is a group of product flavors. You must assign all flavors to a flavor dimension; otherwise, you will get the build error.
Error: All flavors must now belong to a named flavor dimension.
The flavor ‘flavor_name’ is not assigned to a flavor dimension.
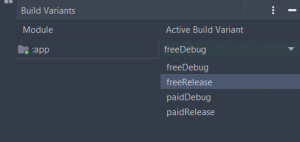
Now click on sync now or run the Gradle build. Once the Gradle build is done, you can see your created product flavors inside the Build Variants tab.

Now each flavor can perform a different set of tasks such as – Unique app display name, android package name, app icon and colour themes.
You can create as many product flavors as you want in your app. Then each flavor can have unique properties and different code files.
This is how you can define flavors –
flavorDimensions “version”
productFlavors {
create(“Wave-2”) {
dimension “version”
versionName “$defaultConfig.versionName” + “.wave-2”
// diff package name
applicationId “com.app.adv”
resValue “string”, “app_name”, “@string/wave2_app_name”
resValue “color”, “colorPrimary”, “@color/colorPrimaryWave2”
resValue “color”, “colorPrimaryDark”, “@color/colorPrimaryDarkWave2”
resValue “color”, “colorAccent”, “@color/colorAccentWave2”
resValue “color”, “colorPrimary_op20”, “@color/colorPrimary_op20Wave2”
// diff app icon
manifestPlaceholders = [
appIcon: “@mipmap/ic_launcher_wave_2”,
appIconRound: “@mipmap/ic_launcher_round_wave_2”
]
}
create(“QA”) {
dimension “version”
versionName “$defaultConfig.versionName” + “.qa”
applicationId “com.app.dev”
resValue “string”, “app_name”, “@string/qa_app_name”
resValue “color”, “colorPrimary”, “@color/colorPrimaryQA”
resValue “color”, “colorPrimaryDark”, “@color/colorPrimaryDarkQA”
resValue “color”, “colorAccent”, “@color/colorAccentQA”
resValue “color”, “colorPrimary_op20”, “@color/colorPrimary_op20QA”
manifestPlaceholders = [
appIcon : “@mipmap/ic_launcher_qa”,
appIconRound: “@mipmap/ic_launcher_qa_round”
]
}
}
Want to add different code files to each product flavor?
Yes, you can do this. First of all, you need to define a structure for each product flavor.
- Head down to the Project structure of your app, and right-click on the src folder.
- Choose New -> Folder -> Java Folder
- Choose the target productFlavor name.
Conclusion
Use this awesome android feature to create multiple apps without worrying about different codebases. It helps to keep the code tidy. I got to learn about product flavors through my task. And I was able to gain some useful insights from my learning. If you want to learn more about Product Flavors, go through Google’s official document.
https://developer.android.com/studio/build/build-variants


Add comment