In the realm of machine learning and computer vision, image classification serves as a foundational task, enabling computers to categorize images into various classes or labels. Convolutional Neural Networks (CNNs), with their deep architectures, have emerged as a powerful tool for this task, showing remarkable success in recognizing patterns and features in images. PyTorch, a flexible and intuitive deep learning library, offers an accessible platform for implementing and training CNN models. This blog provides a comprehensive guide to understanding and applying CNNs for image classification using PyTorch.
What is Convolutional Neural Networks?

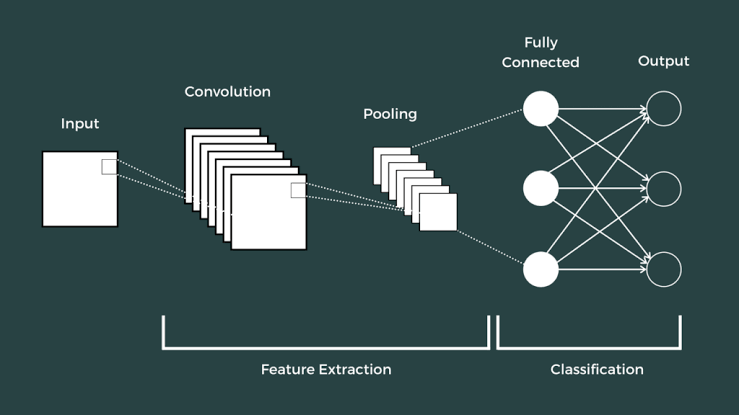
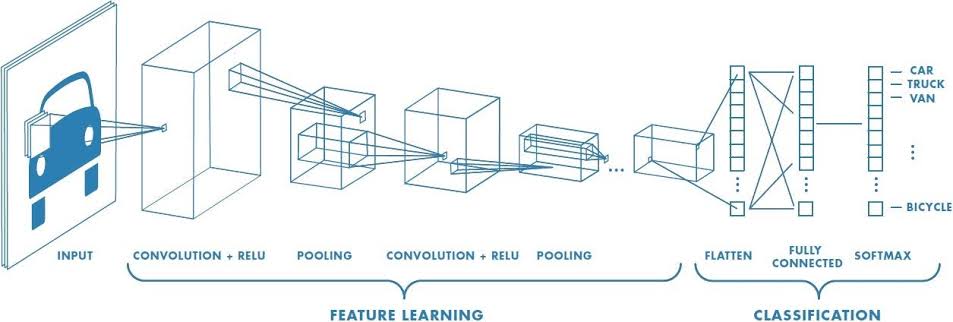
At the core of CNNs lies their ability to automatically and efficiently extract features from images, a task traditionally performed by hand-engineered filters. A CNN architecture is typically composed of several layers:
Convolutional Layer: This layer applies a set of learnable filters to the input image, capturing spatial features such as edges and textures. Each filter produces a feature map that emphasizes the presence of specific features in the input.
ReLU Layer: The Rectified Linear Unit (ReLU) layer introduces non-linearity into the network, allowing it to learn complex patterns. It operates by replacing all negative pixel values in the feature map with zero.
Pooling Layer: Pooling (usually max pooling) reduces the spatial size of the feature maps, decreasing the number of parameters and computation in the network. This helps to prevent overfitting and improves generalization.
Fully Connected Layer: After several convolutional and pooling layers, the high-level reasoning in the network is done via fully connected layers. A fully connected layer takes all neurons in the previous layer and connects it to every single neuron it has.
The combination of these layers enables CNNs to learn hierarchical feature representations of the input images, making them exceptionally good at recognizing visual patterns.
Setting up the Environment

Before diving into coding, ensure you have Python and PyTorch installed in your environment. PyTorch can be installed using pip, Python’s package installer. Run the following command in your terminal or command prompt:
bash
pip install torch torchvision
It’s a good practice to use a virtual environment for Python projects to manage dependencies effectively.
Preparing the Dataset
For our example, we’ll use the CIFAR-10 dataset, which consists of 60,000 32×32 color images in 10 classes. PyTorch makes it easy to load and preprocess datasets through the torchvision package. Here’s how to load CIFAR-10:
python
import torchvision
import torchvision.transforms as transforms
# Define transformations
transform = transforms.Compose(
[transforms.ToTensor(),
transforms.Normalize((0.5, 0.5, 0.5), (0.5, 0.5, 0.5))])
# Load CIFAR-10 training and test datasets
trainset = torchvision.datasets.CIFAR10(root=’./data’, train=True,
download=True, transform=transform)
trainloader = torch.utils.data.DataLoader(trainset, batch_size=4,
shuffle=True)
testset = torchvision.datasets.CIFAR10(root=’./data’, train=False,
download=True, transform=transform)
testloader = torch.utils.data.DataLoader(testset, batch_size=4,
shuffle=False)
This code loads the CIFAR-10 dataset and applies a simple transformation to normalize the images.
Building the CNN Model

In PyTorch, defining a model involves creating a class that inherits from nn.Module and defining the layers in the __init__ method. The data flow through the layers is specified in the forward method. Here’s a simple CNN for CIFAR-10 classification:
python
import torch.nn as nn
import torch.nn.functional as F
class Net(nn.Module):
def __init__(self):
super(Net, self).__init__()
self.conv1 = nn.Conv2d(3, 6, 5) # Input channels, output channels, kernel size
self.pool = nn.MaxPool2d(2, 2)
self.conv2 = nn.Conv2d(6, 16, 5)
self.fc1 = nn.Linear(16 * 5 * 5, 120)
self.fc2 = nn.Linear(120, 84)
self.fc3 = nn.Linear(84, 10)
def forward(self, x):
x = self.pool(F.relu(self.conv1(x)))
x = self.pool(F.relu(self.conv2(x)))
x = x.view(-1, 16 * 5 * 5)
x = F.relu(self.fc1(x))
x = F.relu(self.fc2(x))
x = self.fc3(x)
return x
net = Net()
This model features two convolutional layers, followed by three fully connected layers. The view method reshapes the tensor so it can be fed into the fully connected layers after convolution and pooling operations.
Training the Model
Training a CNN with PyTorch involves several steps: defining a loss function, choosing an optimizer, and then looping over our dataset, feeding inputs to the model, and optimizing. Here’s a basic training loop for our CNN model:
python
import torch.optim as optim
criterion = nn.CrossEntropyLoss()
optimizer = optim.SGD(net.parameters(), lr=0.001, momentum=0.9)
for epoch in range(10): # loop over the dataset multiple times
running_loss = 0.0
for i, data in enumerate(trainloader, 0):
inputs, labels = data
optimizer.zero_grad() # zero the parameter gradients
outputs = net(inputs) # forward pass
loss = criterion(outputs, labels)
loss.backward() # backward pass
optimizer.step() # optimize
running_loss += loss.item()
if i % 2000 == 1999: # print every 2000 mini-batches
print(‘[%d, %5d] loss: %.3f’ %
(epoch + 1, i + 1, running_loss / 2000))
running_loss = 0.0
print(‘Finished Training’)
This script trains the network for 10 epochs, showing the loss every 2000 mini-batches. The zero_grad method clears old gradients, while the backward method computes the gradient of the loss with respect to the model parameters. optimizer.step updates the parameters.
Improving Model Performance
Improving a CNN’s performance can involve several strategies, such as data augmentation, using more complex models, or employing techniques like dropout and batch normalization to prevent overfitting. Experimenting with different architectures (e.g., adding more convolutional layers) and tuning hyperparameters (e.g., learning rate, batch size) are also crucial steps in enhancing your model’s accuracy.
Conclusion
CNNs have revolutionized the field of image classification, offering both high accuracy and efficiency in processing large datasets. PyTorch provides an accessible and powerful framework for building and training CNNs, catering to both beginners and experienced practitioners in the field of deep learning. By following the steps outlined in this guide, you can start implementing your own CNN models for various image classification tasks. Remember, the journey to mastering deep learning involves continuous learning and experimentation, so don’t hesitate to explore more advanced models and techniques as you grow your skills.


Add comment