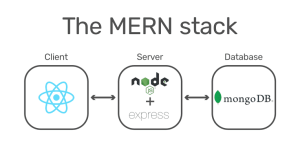
The MERN stack is a powerful toolset for building web applications. Here,
- MongoDB is used for the database.
- Express is a web application framework for Node.js.
- React is a front-end library for building user interfaces.
- Node.js is a JavaScript runtime.
These technologies allow us to create a full-stack application using only JavaScript. In this blog, we will create a simple application to manage a list of items, complete with functionality to add, view, update, and delete items.
Setting Up the Development Environment

Before we begin coding, we need to set up our development environment.
- Install Node.js and npm: Make sure you have Node.js and npm installed on your machine. You can download them from the official Node.js website.
- Install MongoDB: Download and install MongoDB from the official MongoDB website.
- Create a project directory: Organize your project files by creating a dedicated directory for your MERN stack project.
bash
mkdir mern-crud-app
cd mern-crud-app
Backend Setup: Node.js and Express

Now, let us set up the backend using Node.js and Express.
Initialize a new Node.js project:
bash
npm init -y
This command creates a package.json file with default settings.
Install necessary dependencies:
bash
npm install express mongoose body-parser cors
These packages include Express for building the web server, Mongoose for interacting with MongoDB, Body-Parser for parsing incoming request bodies, and CORS for handling cross-origin requests.
Create the server:
Create a server.js file in the project directory:
javascript
const express = require(‘express’);
const mongoose = require(‘mongoose’);
const bodyParser = require(‘body-parser’);
const cors = require(‘cors’);
const app = express();
const PORT = 5000;
app.use(cors());
app.use(bodyParser.json());
mongoose.connect(‘mongodb://localhost:27017/merncrud’, { useNewUrlParser: true, useUnifiedTopology: true });
const connection = mongoose.connection;
connection.once(‘open’, () => {
console.log(‘MongoDB database connection established successfully’);
});
app.listen(PORT, () => {
console.log(`Server is running on port: ${PORT}`);
});
This code sets up an Express server, connects to a MongoDB database, and listens for incoming requests on port 5000.
Define the data model:
Create a models directory and add a item.model.js file:
javascript
const mongoose = require(‘mongoose’);
const Schema = mongoose.Schema;
let Item = new Schema({
name: {
type: String
},
description: {
type: String
},
price: {
type: Number
}
});
module.exports = mongoose.model(‘Item’, Item);
This schema defines the structure of our items, which will have a name, description, and price.
Backend API: CRUD Operations
The next step will be to set up routes to handle CRUD operations.
Set up routes:
Create a routes directory and add a item.route.js file:
javascript
const express = require(‘express’);
const router = express.Router();
let Item = require(‘../models/item.model’);
// Get all items
router.route(‘/’).get((req, res) => {
Item.find((err, items) => {
if (err) {
console.log(err);
} else {
res.json(items);
}
});
});
// Get item by ID
router.route(‘/:id’).get((req, res) => {
let id = req.params.id;
Item.findById(id, (err, item) => {
res.json(item);
});
});
// Add a new item
router.route(‘/add’).post((req, res) => {
let item = new Item(req.body);
item.save()
.then(item => {
res.status(200).json({‘item’: ‘item added successfully’});
})
.catch(err => {
res.status(400).send(‘adding new item failed’);
});
});
// Update an item
router.route(‘/update/:id’).post((req, res) => {
Item.findById(req.params.id, (err, item) => {
if (!item)
res.status(404).send(‘data is not found’);
else
item.name = req.body.name;
item.description = req.body.description;
item.price = req.body.price;
item.save().then(item => {
res.json(‘Item updated!’);
})
.catch(err => {
res.status(400).send(‘Update not possible’);
});
});
});
// Delete an item
router.route(‘/delete/:id’).delete((req, res) => {
Item.findByIdAndRemove({_id: req.params.id}, (err, item) => {
if (err) res.json(err);
else res.json(‘Item deleted successfully’);
});
});
module.exports = router;
Add the routes to server.js:
javascript
Copy code
const itemRoutes = require(‘./routes/item.route’);
app.use(‘/items’, itemRoutes);
This code sets up the routes to handle requests for adding, reading, updating, and deleting items.
Frontend Setup: React
Now let us set up the frontend using React.
Create a React application:
bash
npx create-react-app client
cd client
npm start
This command creates a new React application and starts the development server.
Install Axios for HTTP requests:
bash
npm install axios
Axios is a promise-based HTTP client for making requests to the backend.
Set up the basic structure:
Create components and services directories:
bash
mkdir src/components
mkdir src/services
Creating React Components

Now we will create React components for listing, creating, and updating items.
List Items Component:
Create ListItems.js in the components directory:
javascript
import React, { Component } from ‘react’;
import axios from ‘axios’;
export default class ListItems extends Component {
constructor(props) {
super(props);
this.state = { items: [] };
}
componentDidMount() {
axios.get(‘http://localhost:5000/items/’)
.then(response => {
this.setState({ items: response.data });
})
.catch(error => {
console.log(error);
});
}
render() {
return (
<div>
<h3>Item List</h3>
<table className=”table table-striped”>
<thead>
<tr>
<th>Name</th>
<th>Description</th>
<th>Price</th>
</tr>
</thead>
<tbody>
{ this.state.items.map((item, i) => (
<tr key={i}>
<td>{item.name}</td>
<td>{item.description}</td>
<td>{item.price}</td>
</tr>
))}
</tbody>
</table>
</div>
);
}
}
This component fetches the list of items from the backend and displays them in a table.
Create Item Component:
Create CreateItem.js in the components directory:
javascript
import React, { Component } from ‘react’;
import axios from ‘axios’;
export default class CreateItem extends Component {
constructor(props) {
super(props);
this.onChangeName = this.onChangeName.bind(this);
this.onChangeDescription = this.onChangeDescription.bind(this);
this.onChangePrice = this.onChangePrice.bind(this);
this.onSubmit = this.onSubmit.bind(this);
this.state = {
name: ”,
description: ”,
price: 0
};
}
onChangeName(e) {
this.setState({
name: e.target.value
});
}
onChangeDescription(e) {
this.setState({
description: e.target.value
});
}
onChangePrice(e) {
this.setState({
price: e.target.value
});
}
onSubmit(e) {
e.preventDefault();
const newItem = {
name: this.state.name,
description: this.state.description,
price: this.state.price
};
axios.post(‘http://localhost:5000/items/add’, newItem)
.then(res => console.log(res.data));
this.setState({
name: ”,
description: ”,
price: 0
});
}
render() {
return (
<div style={{marginTop: 10}}>
<h3>Create New Item</h3>
<form onSubmit={this.onSubmit}>
<div className=”form-group”>
<label>Name: </label>
<input type=”text”
className=”form-control”
value={this.state.name}
onChange={this.onChangeName}
/>
</div>
<div className=”form-group”>
<label>Description: </label>
<input type=”text”
className=”form-control”
value={this.state.description}
onChange={this.onChangeDescription}
/>
</div>
<div className=”form-group”>
<label>Price: </label>
<input type=”number”
className=”form-control”
value={this.state.price}
onChange={this.onChangePrice}
/>
</div>
<div className=”form-group”>
<input type=”submit” value=”Create Item” className=”btn btn-primary” />
</div>
</form>
</div>
);
}
}
This component provides a form to create a new item and submits it to the backend.
Update Item Component:
Create UpdateItem.js in the components directory:
javascript
import React, { Component } from ‘react’;
import axios from ‘axios’;
export default class UpdateItem extends Component {
constructor(props) {
super(props);
this.onChangeName = this.onChangeName.bind(this);
this.onChangeDescription = this.onChangeDescription.bind(this);
this.onChangePrice = this.onChangePrice.bind(this);
this.onSubmit = this.onSubmit.bind(this);
this.state = {
name: ”,
description: ”,
price: 0
};
}
componentDidMount() {
axios.get(‘http://localhost:5000/items/’+this.props.match.params.id)
.then(response => {
this.setState({
name: response.data.name,
description: response.data.description,
price: response.data.price
})
})
.catch(error => {
console.log(error);
});
}
onChangeName(e) {
this.setState({
name: e.target.value
});
}
onChangeDescription(e) {
this.setState({
description: e.target.value
});
}
onChangePrice(e) {
this.setState({
price: e.target.value
});
}
onSubmit(e) {
e.preventDefault();
const obj = {
name: this.state.name,
description: this.state.description,
price: this.state.price
};
axios.post(‘http://localhost:5000/items/update/’+this.props.match.params.id, obj)
.then(res => console.log(res.data));
this.props.history.push(‘/’);
}
render() {
return (
<div>
<h3>Update Item</h3>
<form onSubmit={this.onSubmit}>
<div className=”form-group”>
<label>Name: </label>
<input type=”text”
className=”form-control”
value={this.state.name}
onChange={this.onChangeName}
/>
</div>
<div className=”form-group”>
<label>Description: </label>
<input type=”text”
className=”form-control”
value={this.state.description}
onChange={this.onChangeDescription}
/>
</div>
<div className=”form-group”>
<label>Price: </label>
<input type=”number”
className=”form-control”
value={this.state.price}
onChange={this.onChangePrice}
/>
</div>
<div className=”form-group”>
<input type=”submit” value=”Update Item” className=”btn btn-primary” />
</div>
</form>
</div>
);
}
}
This component fetches the item to be updated and provides a form to update its details.
Connecting Frontend to Backend

Finally, let us connect the frontend to the backend.
Update React App:
Modify App.js:
javascript
import React from ‘react’;
import { BrowserRouter as Router, Route, Link } from ‘react-router-dom’;
import ‘bootstrap/dist/css/bootstrap.min.css’;
import CreateItem from ‘./components/CreateItem’;
import ListItems from ‘./components/ListItems’;
import UpdateItem from ‘./components/UpdateItem’;
function App() {
return (
<Router>
<div className=”container”>
<nav className=”navbar navbar-expand-lg navbar-light bg-light”>
<Link to=”/” className=”navbar-brand”>MERN-Stack CRUD App</Link>
<div className=”collapse navbar-collapse”>
<ul className=”navbar-nav mr-auto”>
<li className=”navbar-item”>
<Link to=”/” className=”nav-link”>Items</Link>
</li>
<li className=”navbar-item”>
<Link to=”/create” className=”nav-link”>Create Item</Link>
</li>
</ul>
</div>
</nav>
<br/>
<Route path=”/” exact component={ListItems} />
<Route path=”/edit/:id” component={UpdateItem} />
<Route path=”/create” component={CreateItem} />
</div>
</Router>
);
}
export default App;
The above sets up the routing for our React application. It allows us to navigate between the list, create, and update item pages.
Conclusion
By following this tutorial, you have built a simple CRUD application using the MERN stack. You have learned how to set up a development environment, create a backend with Node.js and Express, connect it to a MongoDB database, and build a frontend with React. This application serves as a foundation for more complex projects, and you can expand it by adding more features such as user authentication, advanced search, and more.


