Introduction
In the previous blog, we discussed the best practices for application teams to use Kubernetes. I hope that the information presented in the last one was helpful to everyone working on microservices. Today, this blog aims to educate DevOps and platform teams on the process of creating Kubernetes clusters that are scalable, sustainable and secure. The Kubernetes principles of governance and cluster settings will be the topics we cover in this blog.
Cluster Governance
Define Resource Quota
When numerous users or teams share a cluster with a set number of nodes, there is a danger that one team could take more than its fair share of resources. Administrators can alleviate this worry by enforcing resource quotas.
If you have a ResourceQuota object, it can set limits on how much of a given resource can be used in total across all namespaces. It can limit the number of things generated in a namespace by type and the overall amount of computing resources that resources may consume in that namespace.
There are multiple “namespaces” where various groups can do their job.
For each namespace, the administrator will set a unique ResourceQuota.
Users generate namespace resources (pods, services), and the quota system monitors their consumption to guarantee they don’t exceed the quota they’ve set for themselves using a ResourceQuota.
If creating or editing a resource exceeds a quota constraint, the request will fail with HTTP status code 403 FORBIDDEN with a notice detailing the violated rule.
Users must provide requests or limits for those numbers if the quota is enabled in a namespace for computing resources like CPU and memory; otherwise, the quota system may refuse pod creation. Hint: Use the LimitRanger admission controller to force defaults for pods that make no compute resource demand.
You can read more here.
Pod Security Policy
In Kubernetes, security risks are mitigated, and secure configurations are mandated using policies that apply to pods. There is still some work to be done on the security policies for Kubernetes pods. The default security policies for pods are unlikely to be adequate.
Its pod security policy defines the requirements for joining a Kubernetes cluster. They control the data transfer and storage practices of individual pods. Configurable access restrictions can be tied to specific roles.
Policies applied to Kubernetes Pods on the Cluster Level
There should not be any confusion regarding the security protocols for pods. It is a common misconception that pod security policies are used to establish pod security settings. However, this is not the case. The security regulations of Kubernetes don’t apply to individual pods; instead, they use the entire cluster.
The YAML files are where the pod safety rules are defined. We won’t waste your time by attempting to describe YAML files because anyone familiar with Kubernetes will already be aware of what they are. The documentation for Kubernetes includes an explanation of the policy settings for pods and examples of policy files.
To enable the security policy of a pod, one must use the kubectl command.
Example: kubectl create -f your-new-policy.yaml
Setting up Pod Security Policy
First, you need to turn on the security for Kubernetes pods. Remember that not all Kubernetes distributions automatically turn on pod security policies. Kubernetes pod security policies are helpful for automatically enforcing strict security policies across an entire cluster. Pod security policies are essential to keeping Kubernetes and its containers secure, but they may not be the most exciting topic to discuss with coworkers. Some markers down the line,
- Don’t run containers in privileged mode.
In privileged mode, Kubernetes containers have full access to the host system. Giving containers many permissions is a security risk, yet it’s sometimes necessary.
To enable,
apiVersion: policy/v1beta1
kind: PodSecurityPolicy
metadata:
name: prevent-privileged-containers
spec:
privileged: false
- Privilege Escalation
A process running in a container is the same as any other process on the host, save for a tiny bit of metadata. Thus, the user with the highest possible privileges on the host system is also the highest possible privilege in a container (uid 0).
A user can gain access to the host system using the same root user to run an application in a container.The most effective defense against privilege escalation attacks is to grant containerized environments the ability to use ordinary users.
In Kubernetes, pod security policies make it simple to prevent containers from executing with root privileges:
apiVersion: policy/v1beta1
kind: PodSecurityPolicy
metadata:
name: no-privilege-escalation
spec:
MustRunAsNonRoot: true
- Group your policies together
The security policies for Kubernetes pods we have examined thus far exist in separate files. You’re free to build up your cluster that way if you like, but in production environments, it’s more efficient to have everything in one centralized configuration file. That way, you can avoid having to create and activate multiple files.
A file that specifies multiple security directives would look like this:
apiVersion: policy/v1beta1
kind: PodSecurityPolicy
metadata:
name: secure-policy
spec:
privileged: false
spec:
readOnlyRootFilesystem: true
spec:
allow privilege escalation: false
spec:
MustRunAsNonRoot: true
Network Policy
Kubernetes does not limit communications between pods operating inside the cluster by default. Because no firewalls restrict intra-cluster communication, any pod may connect to any other pod.
Network Policies enable you to specify which pods may connect declaratively. These rules may be specific: you can define which namespaces are permitted to interact or determine which port numbers to enforce each restriction.
ACLs have been used in computers for decades to regulate who can view what. Kubernetes handles pod ACLs this way. Network Policies are declarative manifests, like other Kubernetes resources. You may change them in your source repository before sending them to Kubernetes.
Near-real-time network policies are implemented. If you apply a Network Policy to halt an open connection between pods, the association ends immediately. This near-real-time advantage reduces networking performance; see this test.
You can read more here.
Role-Based Access Control Policies
Having a Role-based Access Control Policy in your k8s system is imperative. Too much access is too many risks. Users with object creation permissions in a cluster may be able to generate an overwhelming amount of objects or objects of an enormous size, which might lead to a denial of service.
RBAC defines an individual’s permissions within a Kubernetes cluster and namespace, respectively. Use role and cluster role bindings to give these roles to certain Kubernetes subjects (users, groups, or service accounts). Kubernetes allows you to specify bespoke functions or use default user-facing roles, including, but not limited to:
A cluster administrator is a “superuser” with access to all cluster resources. This can be used in either a ClusterRoleBinding or a RoleBinding to allow access to all resources in the cluster or the specified namespace, respectively.
Admin user role grants complete read/write access to all namespace resources. Within a specific namespace, this job has the ability to create new roles and connect those roles to existing ones. It prevents users from making changes to the namespace itself.
The Writer role in Kubernetes provides read/write permissions for a particular namespace. Neither parts nor role bindings may be viewed or altered.
The view role provides only read access to a specified namespace. Not even functions or their ties can be viewed, let alone changed.
Using RBAC in your K8s cluster is crucial for ensuring the safety of your infrastructure. Permissions for a namespace (a Role) or the whole collection may be granted to individual users, groups, or services (ClusterRole). Authorizations may be assigned to a position in more than one way. RoleBinding or ClusterRoleBinding objects associate the roles with their respective users, groups, or service accounts.
The idea of least privilege dictates that just the minimum rights be provided when configuring RBAC roles. The administrators’ group may have access to everything, but the operator’s group could deploy and read data, for example.
Cluster Configuration
CIS Benchmark
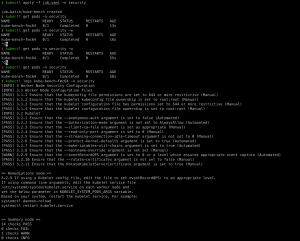
The Center for Internet Security (CIS) is a nonprofit organization operated by the community with an emphasis on enhancing internet security. It is responsible for developing and revising CIS standards and controls. CIS includes over a hundred benchmarks for various product families from different vendors. Consensus-based cybersecurity specialists and subject-matter experts from throughout the globe have developed the CIS standards. CIS standards stand out from the crowd because they are consensus-based, best-practice security planning guidelines established and endorsed by governments, enterprises, sectors, and academic institutions. Kube-bench is one of the offerings from CIS that scans the kubernetes cluster and reports vulnerability.
Example Output:

Logging Directive:
Multiple components of Kubernetes’ infrastructure contribute to the creation of logs. For log aggregation technologies like fluent or FluentBit to work efficiently, the accumulated records must follow a standard format. This is important to remember when doing things like setting up stdout and stderr or using Fluentd to apply labels and metadata. When Elasticsearch or any other logging tool is given access to such organized logs, the analysis time is decreased.
To collect and aggregate organized logs, make sure you collect records from,
- Nodes (kubelet, container runtime)
- The control plane (API server, scheduler, controller manager)
- Kubernetes auditing (all requests to the API server)
The following metadata should be present in the logs,
- Application name.
- Application version.
- Cluster ID. This is useful if you have multiple clusters.
- Container name.
- The cluster node is running this container.
- Pod name running the container.
- The namespace.
Kubernetes has many moving parts, and moving parts need to be monitored and managed. To make logging simpler for administrators, Kubernetes promotes the use of external “Kubernetes Native,” tools that interact smoothly with the system. Using the aforementioned best practices is crucial to have a reliable logging architecture that can handle any circumstance. Together, they ensure the Kubernetes environment is always protected and running at peak efficiency while efficiently using computer resources.
Conclusion
When it comes to creating, operating, and maintaining your Kubernetes cluster, following the best practices described in this article will set you up for success on your road toward developing applications.


Add comment