

Most people use smartphones, including you and me, for their day-to-day activities, and mobile applications are the interface between them and a product.
Mobile app developers are in high demand because smartphones and mobile apps are becoming more popular and making our lives easier. As a result, there is a high demand for skilled mobile app developers who can build high-quality applications for various platforms, such as iOS, Android, and cross-platform.
React JS is a popular frontend JavaScript library that is used to build user interfaces for web applications. It is supported by Facebook and a developer community and is known for its ease of use, flexibility, and reusability.
As the demand for mobile application development grows, developers are looking for solutions that allow them to use their existing web development skills. React Native, a React-based framework, allows developers to create native mobile apps for both the iOS and Android platforms using a component-based architecture.


By using their knowledge of React, developers can quickly learn how to use React Native to build mobile apps, which speeds up development and makes the apps run better. The shared skills and tools also make it possible for users to have the same experience on both the web and mobile platforms, which saves time and money 🙂
In this detailed blog, we will walk you through all the aspects of React Native to help you get started with mobile development.
What Exactly Is React Native?
As we mentioned earlier, React Native is a cross-platform, open-source framework that is used to build mobile apps for platforms like iOS and Android using JavaScript and React. Someone who is good at React can easily start using React Native because it is almost identical to React.
What makes React Native a better choice than other popular alternatives like Flutter is that developers can use their web development skills to create mobile applications. Now with React Native, we don’t need to learn a separate framework or even an entirely new language. We can use one language everywhere: JavaScript.
Some of the top tech companies, including Instagram, Airbnb, Tesla, Skype, and Discord, use React Native to create high-quality, performant mobile apps for their customers.
What are the benefits of using React Native?
React Native aids in the development of high-quality applications while also providing many features out of the box. Some of the advantages of using React Native include:
- Cross-platform compatibility: With React Native, developers can create apps that run on both the iOS and Android platforms using a single codebase. Eliminating the need to create separate codebases for each platform, saves time and effort.
- Reusable components: Because React Native is built on a component-based architecture, developers can create reusable user interface components. This makes it easier to create and maintain complex apps with a consistent look and feel.
- Native performance: React Native takes an innovative approach to convert JavaScript code into native code, allowing it to run natively on both the iOS and Android platforms. As a result, apps with high performance and a native look and feel are produced.
- Faster development: React Native enables developers to build mobile apps using their existing web development skills, which speeds up the development process. It also comes with a plethora of libraries and tools that make it easier to create complex apps quickly.
- Hot reloading: Hot reloading is a React Native feature that allows developers to see the changes they make to the app in real-time. This saves time and effort by removing the need to rebuild the app after each change.
- UI Focused: Using the React JavaScript Library, React Native makes app interfaces fast and responsive. It can render excellent graphics and uses a component-based approach that makes creating complex UI designs simple.
- Third-Party Plugins: React Native comes with a number of third-party plugins, including native and JavaScript-based modules. Third-party plugins can eliminate the need for certain web view functions while improving the app’s functionality and performance.
- Large and active developer community: Because React Native has a large and active developer community, there are many resources available for learning and problem-solving. This makes it easier for developers to create high-quality apps in a timely and efficient manner.
How does React Native work under the hood?
There are three threads running in React Native: the UI thread, the shadow thread, and the JavaScript thread.
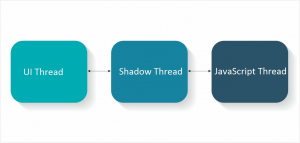

Threads in React Native
UI Thread: This is the thread responsible for accessing the app’s user interface.
Shadow Thread: This thread calculates the layout of an application using the React library in the background
JavaScript Thread: Executes React (JavaScript code) code in the JavaScript thread
When you open a React Native app, it starts a JavaScript thread that creates the layout. This layout is then passed on to another thread called the shadow thread. The shadow thread uses a layout engine called Yoga to create a tree from the layout.
To communicate between the two threads, React Native uses a bridge that serializes data in JSON format and sends it to the UI thread (also known as the main thread). When Yoga sends the rendered markup, the bridge sends it to the main thread.
The main thread then takes over and renders the UI, mapping everything from the browser to React Native. This process happens very quickly and efficiently, allowing React Native to create smooth and responsive user interfaces for mobile apps.
How do you make your first React Native application?
While creating your first React Native application, you have primarily two options. Either you use the React Native command-line interface (CLI) or use Expo. Here is a step-by-step guide for both options:
First things first, install NodeJS on your computer, you can download it from the official website of NodeJS.
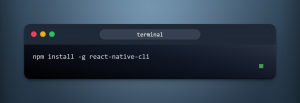
Using React Native CLI
Install the React Native CLI by running the following command in your terminal:

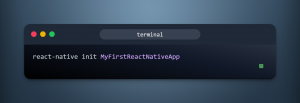
Create a new React Native project by running the following command:

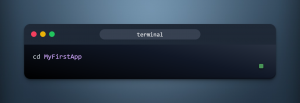
After initializing a new React Native app, navigate to the project directory by running the change directory command.

You can now start running the app on an Android or iOS simulator, whichever you have.
For running on Andriod, run this command:
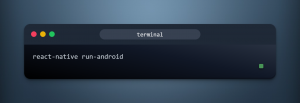

For running on iOS, run the following command:
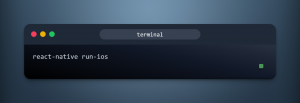

This will start a simulator on your machine where you can view your app, you can start editing the code, and see the effect in real-time.
Using Expo
You can simply create and distribute React Native apps using the free and open-source platform Expo. It offers a selection of tools and services that streamline the development procedure, accelerating and improving it.
Install Expo CLI by running the following command in your terminal:


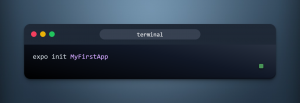
Create a new Expo project by running the following command and choosing a template for your app, or select “blank” if you want to start from scratch.

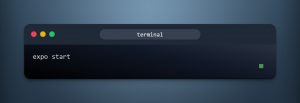
Navigate to the project directory by using the change directory command, and start the app by running the following command.

Pros and Cons of React Native CLI and Expo
Both CLI, as well as Expo, have their best part as well as their drawback, in this section we can look into that.
Easy Setup
- React Native CLI requires some additional setup and configuration compared to Expo, but it provides more control over the project setup
- Expo provides an easy setup experience with a pre-configured project structure, but it may not be suitable for more complex projects.
Custom Native Code
- React Native CLI allows you to add custom native code to your project, giving you more control over the app’s functionality.
- Expo restricts access to native modules, which means that you cannot add custom native code to your project.
Real-time development experience on a physical device
- Both Expo and CLI support that
Over-the-Air Updates
- React Native CLI does not provide built-in support for over-the-air updates, but you can use third-party tools or implement your own solution.
- Expo provides built-in support for over-the-air updates, which makes it easy to push updates to your app without going through the app store approval process.
Third-Party Libraries
- React Native CLI allows you to use any third-party library that is compatible with React Native.
- Expo provides access to a curated list of third-party libraries that are pre-configured for use with Expo projects, but you may not be able to use all third-party libraries that are compatible with React Native.
Ejecting
- React Native CLI allows you to eject your project from the React Native CLI and take full control of the native code.
- Expo allows you to eject your project from Expo and take full control of the native code, but this may require more effort than ejecting from React Native CLI.
How to Style your React Native app
There are a lot of different ways that you can style your React Native application, which is an important step in the process of developing a user-friendly interface. Styling your application is an essential component of the development process.
Here are some of the ways in which you can style your application:
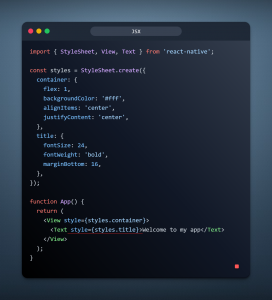
Use StyleSheet
For styling components, React Native provides the StyleSheet API. With this API, you can define styles for your components, and then reference them in your JSX code.

Use platform-specific styles
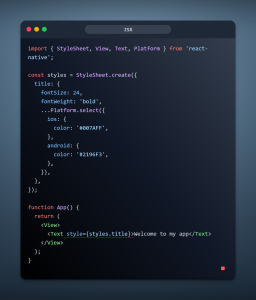

React Native provides platform-specific styles that help you create a native look and feel for your app. For example, you can use the Platform module to conditionally apply styles based on the current platform.
Use third-party UI libraries
React Native has a rich collection of third-party UI libraries that offer pre-styled components and stylesheets, helping you create visually appealing and functional interfaces without having to start from scratch.
Some of the popular UI libraries that you can use are React Native Elements, NativeBase, Shoutem, Bootstrap, and Tailwind. These libraries provide a wide range of customizable components that can save you time and effort, allowing you to focus on creating unique features for your app.
Best practices while using React Native
The following is a list of some best practices to keep in mind when developing your React Native app:
Keep your components small and focused: By keeping your components small and contained, you may increase their reusability and make maintenance easier. As a result, fewer pointless re-renders are required, which improves performance.
Use functional components and hooks: Functional components and hooks are favored over class components when writing React Native components since they provide greater performance and are simpler to understand.
Use Flexbox for layout: React Native uses Flexbox for layout, so it’s important to understand how Flexbox works and use it effectively to create responsive layouts.
Use platform-specific components: React Native provides a set of platform-specific components, such as Text and View, that help you create a native look and feel for your app. Use them instead of custom components whenever possible.
Use third-party libraries judiciously: While third-party libraries can be a better way to expand the functionality of your program, they can also complicate and slow it down. Use only widely used, well-maintained libraries, and significantly enhance your program.
Optimize performance: Performance is critical for a good user experience. Use tools like the React Native Performance Monitor to identify and fix performance issues in your app.
Test your app thoroughly: Thoroughly test your app on multiple devices, including different versions of iOS and Android, to ensure that it works correctly and looks good on all devices.
Keep your code clean and well-organized: Keep your coding style consistent, and arrange your code so that it is simple to read and maintain. For sophisticated code explanations, use comments and documentation.
There are many other best practices that you can follow, and by getting used to React Native, you will have an understanding of how to maintain your code efficiently.
Wrapping it up
Congratulations on completing this guide on getting started with React Native! I hope you find it helpful and informative.
We covered the fundamentals of React Native and how to create your first app using either the React Native CLI or Expo in this guide. We also discussed the advantages and disadvantages of each approach and some common problems you might run into while developing with React Native.
Remember that React Native is an extremely powerful tool for developing cross-platform mobile apps, and there is always more to learn. I encourage you to learn more about the React Native ecosystem, which includes third-party libraries, community forums, and official documentation.
Thanks for reading, and happy coding!
